Configuring a Policy for Reporting Storage
Review the sections below for details on setting up the necessary data required to use the system to report storage values and calculate storage premium.
General Storage Settings for Declarations
Why would I configure general storage settings for Declarations?
The policy’s assureds are using the system to report storage declarations and you need to specify configuration details in order to use the system’s Storage Declaration section.
Before Getting Started
- You access an existing policy in the system.
- You are assigned the Edit Policy security right.
- The policy has a saved Definition and you checked the box for 'Are assureds reporting storage declarations?'.
- Verify the policy’s status is Incomplete so you can make changes. If the policy’s status is Confirmed, navigate to Review/ Confirmation and click Suspend Policy Activity.
Steps
-
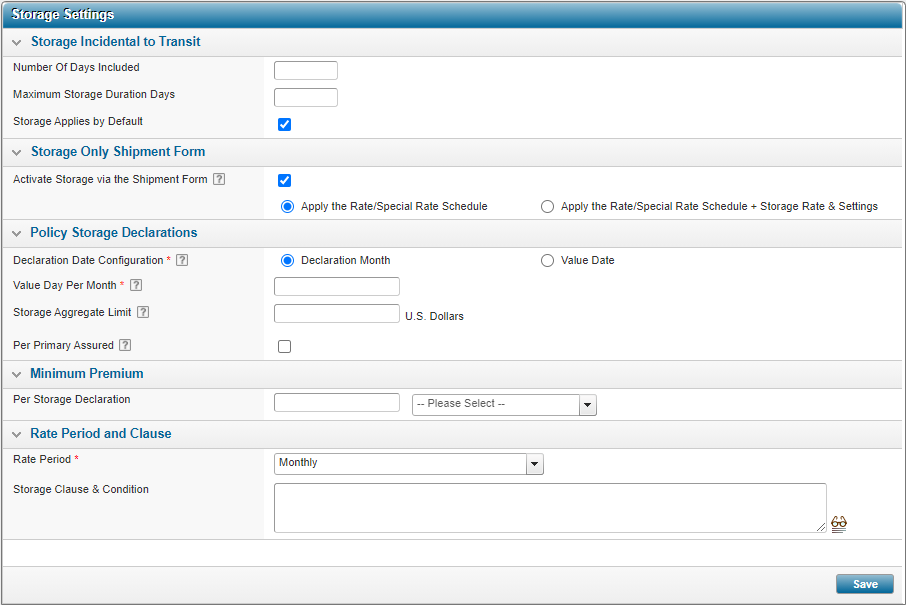
Navigate to Configuration, then Storage, and click Storage Settings.
-
In the Policy Storage Declarations panel, select the Declaration Date Configuration option which determines if your assureds will need to select a month or specify a specific value date each time they add a storage declaration.
-
If you select Month, you must then also enter the actual Value Day per Month. This date will not be visible to the assured but is used for system processing. Entering ‘31’ for example will ensure that the last day of each month is used (regardless if the month has less than 31 days). The “value date” determines:
- Which policy record applies (in combination with the Declaration’s selected month/year).
- Which declarations are aggregated together when the system validates the policy/location/primary assured’s limits.
- When each declaration will be invoiced (if using the system’s billing module).
Tip: When the policy’s effective date does not start on the first day of a month, consider selecting a date after the effective date of the policy term to ensure the declarations with that month can be booked.
For example: The original policy term is January 15, 2017 to January 14th, 2018. If the declaration’s Value Day is the 1st, then it would not be possible to declare for January 2017.
-
If you select Value Date , the assureds will need to select a specific date when declaring each location value. If the assureds do not specify a consistent value date for a given month when entering each declaration, the referral validations against each location/ primary assured will be less valuable. Using the Value Date implies that the Storage Declaration will not use the concept of “period”, but rather individual declarations.
Note: When selecting Value Date you are unable to configure an aggregate limit. Only location limits will apply.
The Declaration Date Configuration field affects how the storage location limits will be applied when validating each declaration. The location limit applies as follows:
-
-
Optionally enter in an Aggregate Limit which will sum all declared values with the same month and year.
Aggregates apply to the Policy Term and do not consider other policy records. A month always refers to the calendar month, regardless of the policy term’s effective and valid until dates.
When Per Primary Assured is selected, the location's Maximum Insurable Limit is aggregated, and will generate a referral upon creating the storage declaration for a given policy record.
- Select the Rate Period.
- Optionally, complete any other fields as required.
- Click Save.
Result
The system saves your changes.

